Pages

Thursday, July 17, 2014

2014 Stampin' Up! Convention

Finally…..Salt Lake City for the Stampin’ Up! Convention!  I am having so much fun.

I arrived a day early and took the train to my beautiful hotel.

Riding trains is not something I get to do in Texas.  It's more than a train ride, it's a new cultural experience!

Yes, the flowers are real!
Next, lunch with my peeps and then on to the "Stamp Across America" class where my card won a contest!!!  The brand new shiny stamp set was my prize!


After that we went to the convention hall to check in and get all our cool convention goodies.
The lines to check in were really long (even though convention doesn't start until tomorrow) but guess what!  The line for people whose names begin with a "D" only had one person in it!  Wow!!!  I walked right up and checked in.  The C's and the E's were kind of giving me the evil eye.  Sorry guys....sometimes it's a good thing to not be popular.


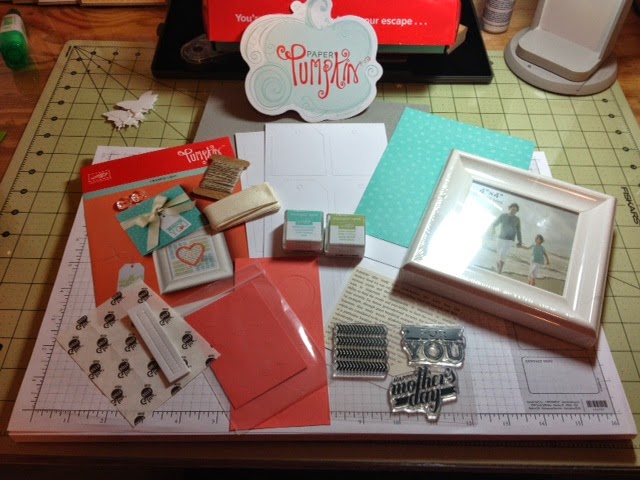
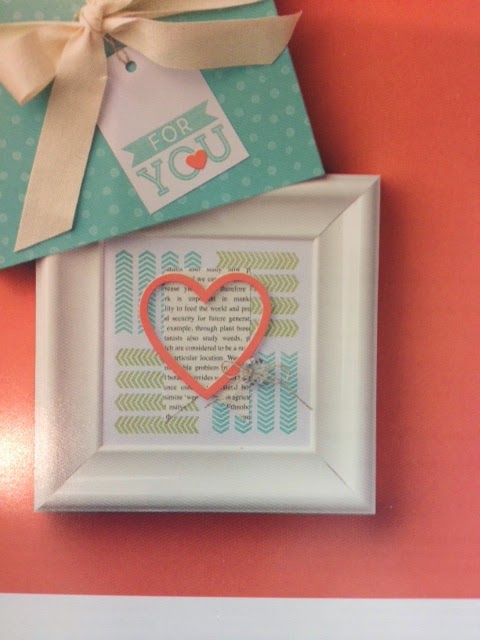
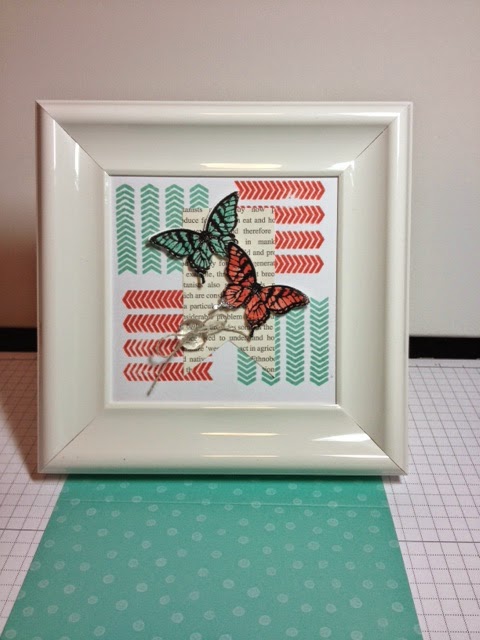
Then we went to a Paper Pumpkin party where they had delicious punch, cookies, cake and brownies....OH MY! and a make and take.  I LOVE MAKE AND TAKES!!!
This project is a sneak peak from September's Paper Pumpkin!  If you're not getting Paper Pumpkin you are missing so much fun!  It's a kit, mailed directly to you each month, with everything you need (except glue) to make some very fun projects.  September's kit will include Halloween stamps, burlap bags and stuff to make cute tags.  There's also little tiny clothespins, stickers and sequins and more.  

Now....I've saved the best for last.  If you want to try Paper Pumpkin, they are offering your first 2 months for 1/2 price.  Yes, I said half price!  Just click the link below to try the best Paper Therapy in a box you'll ever find.  If you want the September Halloween themed kit, you better hurry.


Well that's all my convention news for now.  Time to get some sleep so I'll have lots of energy for another busy day of fun and stamping.  Please sign up for my emails, and until next time.....

Love, Peace Stamps,
~Kim


Monday, June 30, 2014

Fourth of July Party Favors / Milk Carton Box

Milk Carton Box Fourth of July Party Favor


Here is another cute idea for the Fourth of July.  This is called a “milk carton box”.  It is very easy to put together and makes a great party favor.  I’ve used these for Easter, birthdays, little treats to give to co-workers.  You just change the decorations and you have a sweet treat!


They can be filled with candy or you could use them to wrap earrings or a small gift.  You could even roll up some dough as a gift for a graduate…..etc.   If it fits, it will work.

On this one I just changed the color of the box.


Here are the items I used for the little boxes.  If you'd like a free tutorial for the Milk Carton Box just follow my blog and send me your email address.  I'll send you a PDF within 24 hours.

Happy fourth!

Love, Peace Stamps,

~Kim

Thursday, June 26, 2014

Great Stamp Sets for the Fourth of July


 Happy 4th of July!  Well, it’s almost the 4th.  I'm really looking forward to July because....first of all my family has a huge party which is almost like a family reunion. Second, the Stampin' Up! convention is in July and this will be my first convention.  I can't wait to go!  It's in Salt Lake City.  My hotel and airline tickets are paid for and the convention registration was free because I'm a new demonstrator.  That saved me $295.  Three days and an entire convention center full of fellow enthusiastic, stamp crazed, hard core paper artists with ink running through their veins.  Yea Baby!!

There will be classes and workshops and prizes and swaps and ideas and free stamps and.....oh my!  Is that a goose bump? 

Speaking of goosebumps, I made another card-in-a-box in honor of the Red, White and Blue.  I'm obsessed with the cards-in-a-box.  They are fun to make.  It's like paper art meets floral design.....kind of.  The only problem with my cards-in-a-box is that I make them big, and they don't want to fold, and they're hard to mail.  But that's OK because I like them big and full.  And I don't want to fold them anyway.

So here's my 4th of July card-in-a-box.  I'll tell you the supplies I used and try to explain how I did some of the things.  I really need to learn how to do tutorials.  This blogging, tutorial, idea sharing on the internet thing is new to me.  (If you click the product name it will link you to the product in case you want to check it out.)

I used Real Red card stock and stamped the outside bottom of the box with Real Red ink using the chevron looking stamp from the "Work of Art" stamp set.  Then I stamped the remainder of the outside with the small stars from "Be the Star" using Night of Navy ink.


For the flaps I layered Whisper White with the Night of Navy striped paper from the Designer Series Paper Stacks.  I also used the same paper for the back panel of the card.  The little flags are Whisper White mounted on Real Red and the stripes are strips I cut using my "Fringe Scissors" and spaced them evenly. (I just eyeballed it)  Then just attach a star on the top using a dimensional.


The assorted stars used on the card are from the "Be a Star" stamp set and then I cut them using my "Big Shot", the "Magnetic Platform" and the "Stars framelits".  By the way, if you don't have the Magnetic Platform to use with your framelits you have no idea what you're missing.


 The tassels or bursts or whatever you want to call them were made with my Fringe Scissors too.  I just cut pieces of paper most of the way down and rolled them.  Then curled them with my bone folder.  I used a glue dot to adhere a star on one of the tassel thingies.  (sorry for all the techno language)


Add a stamped, cut out star layered with a larger star to the front flap and "Ta Dah!".  I'm seeing fireworks here!  OK, maybe I'm exaggerating a bit, but it's a really cute card, even if I do say so myself.  Oh yea...for the star, I stamped two star images and cut the center star from one of the images and glued it to the center of the other image using my favorite thing in the world, a dimensional.  


Hope you like my card-in-a-box.  Please comment and let me know what you think.  For the rest of the week I have more cute 4th of July creations to share.  They all use these same two stamp sets.  I'll be posting them Thursday and Friday so FOLLOW MY BLOG so you don't miss them.

Have a great day!

Love, Peace, Stamps,

~Kim


Friday, June 20, 2014

Join Stampin’ Up! for $50

Even though, in the teacher world, Friday marks the end of another precious summer week I can’t help but be excited that it’s the weekend!


So……“Let the Wild Rumpus Start”
And speaking of Wild Rumpus, how’d you like to be a part of one of the most fun, creative, wild, crazy and downright wonderful groups I know.
Yes, I’m talking about Stampin’ Up!  This is a job that is designed to be fun.  You take your hobby, that you love, and you include others in doing what you love. 

And for the remainder of this month, you can have all this fun for only $50 a month.

For $50 you get:
1.  $55 in free products of your choice ($55 value)
2.  Catalogs ($15 value)
3.  Order Forms ($7.95 value)
4.  Other business products.
5.  A Paper Pumpkin kit  (how cool!!!) ($19.95 value)
6.  An extra discount on your first order
7.  Free registration for convention in Salt Lake City (July 17-19) ($295 value)
8.  And endless opportunity by owning your own business.
9.  Two free months of your own Demonstrator Website where your customers can    shop online. ($30 value)


Perks of being a Stampin’ Up! demonstrator:
  1. There are no bossy bosses breathing down your neck.  Only people who are there to offer as much or as little support as you want.
  2. The customers you deal with are all happy because this is what they do for fun!
  3. There are no penalties if you decide it’s not for you.
  4. You can just sign up for the discount.  That’s right!  We have demonstrators that are just “Hobby Demos”.  They signed up so they can receive a discount when they purchase Stampin’ Up! products.
  5. There are oodles and oodles of prizes and promotions you can earn in your business.
  6. Did I just say YOUR business?  That’s right, you have your own business.
  7. All the people you work with are happy because they are doing what they love to do….just like you.
  8. We have hundreds and thousands of creative ideas for you to share with your customers in case you get "stamper's block".
  9. You get access to new products and promotions ahead of time.
This offer is a win, win opportunity.  For every penny you spend you get free products plus +++ a Paper Pumpkin kit.  And if it's not for you, you just stop.  There are no automatic shipments if you don't cancel in time...etc...etc...etc..

Interested?  Click here --->www.lovepeacestamps.stampinup.net  and go to the top right and click "Join the Fun".   You'll also find my phone number where you can call or text me any questions you may have.

Or email me here ---> kimdglass@yahoo.com  

Hope to see you on my team!  "Let the Wild Rumpus Start."

Love, Peace, Stamps,
~Kim

*disclosure-Free conference registration does not include transportation, meals or lodging.  But it's jam packed with fun!  <rumpus, rumpus>

Tuesday, June 17, 2014

Stampin' Up! a Fourth of July


I love patriotic decorations.  I think it's because my family has always had great get togethers on the 4th of July.  When I see red, white, and blue it brings back memories of homemade ice-cream, bare feet chasing fireflies and loved ones who have long since gone.

So now that summer is here I'm bringing out the Americana decor.  I'm having so much fun creating accents for my home and cards for my friends and family. 

I started last night with these easy, yet adorable, cards.  Do you see the beautiful Fourth of July Stampin' Up! colors?  Well, they're actually just Cherry Cobbler and Night of Navy, but they fit the 4th of July theme perfectly.


Love, Peace, Stamps,

~Kim

Sunday, May 4, 2014

Stampin' Up! a Teacher Appreciation Gift

 Here's a little idea for a Home Decor item or a Teacher Appreciation Week gift.
Wow!  Do you see the watermark on my photo?  Well that’s a first for me.  Can you feel the excitement?  Every single tiny post that I have made on this blog has been a learning experience.  I am not a techie by far.

But…I am a stamper.  Novice or not, ink (stamping ink that is) runs through my veins.  This little project was inspired by April’s Paper Pumpkin and Teacher Appreciation Week.  I was trying to come up with a cute little gift idea for a special teacher I know.

Remember April’s Paper Pumpkin?  Well here’s a reminder if you don’t.

Stampin’ Up! Paper Pumpkin Kit

My version of the Stampin’ Up! Paper Pumpkin Kit

I didn't get these cute little framed stamping creations out of my system with April's kit.  So I couldn't wait to try another one.  This is my practice picture and I'm really happy with the way it turned out.


The tiny banner was created using the Banner punch that was one of the free items you could earn in this years Sale-A-Bration.  What's that?  You didn't earn one!!  Well, just between you and I my psychic powers are telling me that it will be available in our new catalog coming out June 1st.  <insert cheers and applause>  How fun it that?!?!

I didn't even stamp the banner pieces.  I just punched them from the gorgeous Fresh Prints Designer Series Paper Stack item #132996.  Only $6.95 in our Celebrate the Everyday Occasions catalog.  The Coastal Cabana chevron is an entire 4-1/2 x 6-1/2 page from the same pack.  There are 48 beautiful double sided sheets in this pad and they coordinate with Coastal Cabana, Crumb Cake, Real Red, and Whisper White.  

If you want a pack you better hurry because they will go away on June 1st.


The cute fence was created using the Hardwood background stamp.  Item #133032 is the wood mount number.  I prefer wood mount for my background stamps.  This is one of the most versatile background stamps I have ever seen.  I stamped Crumb Cake card stock  with Chocolate Chip ink (is this making anyone else hungry?) and cut off a 2 inch piece.  Next, I cut the little fence boards out with scissors and snipped the ends with the tip of the banner punch to make them pointy.  (you could do this with scissors if you're really good.)

The happy flowers were stamped in Real Red with A Round Array stamp set.  (Pg. 126 of the current Idea Book and they are not retiring)  Easily punched with 7/8" Scallop Circle punch, item #129404.  Assembled with adhesive and Stampin' Dimensionals.

Did I mention I purchased the frame from the Dollar Tree for....well...er...one dollar?

Here's a recap of what I used:
Stampin Dimensionals
130654
$3.95
Multipurpose Liquid Glue
110755
$3.95
Real Red Classic Stampin’ Pad
126949
$5.95
Chocolate Chip Classic Stampin’ Pad
126979
$5.95
Whisper White Card Stock
100730
$6.95
Crumb Cake Card Stock
120953
$6.95
Hardwood Background Stamp (wood mount)
133032
$17.95
A Round Array Stamp Set (wood mount)
A Round Array Stamp set (clear mount)
129087
129090
$18.95
$14.95
7/8 “ Scallop Punch
129404
$12.95
4x6 Frame from Dollar Tree

$1.00

I love that the supplies used on this project are items I use over and over again.  When buying items for my studio I choose stamp sets and other supplies that are versatile enough to use on multiple projects.  I like to get my money's worth out of every thing I buy.  (It's the Capricorn in me.)

I hope you enjoyed seeing this project.  Until next time.

Love, Peace, Stamps!

~Kim


Sunday, April 27, 2014

Stampin' Up and a Sketch Challenge

My first sketch challenge!

And, with graduation approaching I decided to kill two birds with one stone and make it a card that could be given to a lucky grad.

The challenge came from: 

Challenge: SFF042514


I’ve never done a challenge before so I hope I’ve followed all the rules and included all the correct links and so on and so forth forever and ever amen.


Sketch Frenzy Friday posts a new challenge every Friday.  I liked looking through all the past challenges for ideas.  Sketches are a great way to think of new cards to make.


So here's my card:


Recognize this Designer Series Paper?  It's from Sycamore Street. It was a set that could be earned during last years Stampin' Up! Sale-A-Bration.  I used Calypso Coral, Island Indigo, and Pool Party classic inks and card stock.  My ribbon and button were from Sycamore Street too.  Sure took me long enough to use them, didn't it?
Stamps sets include Itty Bitty Banners and Hearts a Flutter.  Love these sets.  Hearts a Flutter is about to retire.  <sob>  Pennants were cut with Sizzlets and the Calypso Coral card stock was embossed with Textured Impressions Square Lattice.  If you haven't got yourself a Big Shot yet, you don't know what you're missing! 

If you've never used a sketch, you really should give it a try.  It's basically a blueprint for a card.  This particular card/sketch uses two colors or patterns of paper on the front of the card.  Divide the top and bottom with a ribbon, string, a strip of coordinating paper, a row of rhinestones....possibilities are endless.

Add some pennants or some other type of tags, pennants, strips of paper, embellishments along the bottom of the ribbon towards the right of the card and add a sentiment above the ribbon towards the left of the card.  Instant card!

See how they resemble?


When I'm making cards I always make at least two because the most time consuming part for me is deciding on a design.  Now that I have this design I can change it up by changing colors and the sentiment.  It could be a birthday card, thank you card.....you get the idea.


Stampin' Up! colors, coordinated papers and inks always make choosing colors so easy.  The coordinated inks and papers and the quality of their card stock is what drew me to Stampin' Up in the first place so many years ago.

I hope you found something useful on this post.  Check out Sketch Frenzy Friday's blog, try a sketch for inspiration or...make a sketch and inspire someone else!

Happy Stamping!

~Kim

Thursday, April 24, 2014

April Paper Pumpkin

I got my April Paper Pumpkin kit!  I was so excited.  I’ll have to admit I cheated and looked online and found someone who had already received theirs.  So I was pretty sure what it was going to be.

This kit had a lot of cute things in it.  The “plan” was to make a framed picture that could be a Mother’s Day gift if you wanted it to be.  

This is what the picture would look like if you followed the directions.  This is an actual picture of the actual picture that came with the kit.
I wasn’t too big on the heart.  It made me think of Valentine’s Day and I’m past Valentine’s Day and more into spring.  So this is what I decided to make with my kit.
I liked the contrast of the Calypso Coral heart so I decided to use Calypso Coral for two of my stamped images instead of the Pear Pizzazz that came in the kit.

I replaced the heart with two embossed butterflies from Papillon Potpourri which I colored using blending pens.

Cut them out with my butterfly punch.  Attached them with some dimensionals….and viola!  

My own little pretty personalized paper pumpkin picture.

I won't tell you how I struggled to get the dimensional picture to fit behind the glass of the picture frame until I finally read the directions that clearly stated to remove the glass.  (When all else fails, read the directions "sigh".)  Nope, that's my little secret.

What do ya think?  Do you like it?

Want to learn more about Paper Pumpkin?  Here's a link with information.


Friday, April 11, 2014

The New and Improved "Card in a Box"


Remember my “Card in a Box”?  

Well the more I looked at it, the more I didn’t like it.  I know my first attempt at a new type of project is never my best.
But these cards should have a WOW factor, and mine didn’t.  It was just “cool” (yawn).  And “cool” (yawn) isn’t good enough.

So I didn’t mail it…..and it sat in my studio…..and I would look at it…..and look at it…..and not mail it and look at it some more.  And the more I looked at it, the more dissatisfied I became.
Then it hit me!  Add some leaves dummy!  That would add a splash of contrast color….and flowers DO have leaves.  HELLO!!!  (V-8 smack to the head)

So I added some leaves.  And this is the result.  I think it's a huge improvement.  I'm actually going to go ahead and mail it now.  

It's going into the envelope tonight.  

A very large envelope by the way because it turned out to be a very big card.  And bulky too because I used a lot of dimensionals.  (I love dimensionals!)

So here is the end result of my first "card in a box".  Now that I've worked out the kinks and learned a few things, I can't wait to make another one! 

Tuesday, April 8, 2014

The “Card In A Box”

The “Card In A Box”


Oh the procrastination!  Why do I put these things off for so long?  I have been wanting to make a “Card In A Box” since I first lay eyes on one.  I think they’re the coolest thing.  And guess what!  They’re not even hard.  

This little cutie will be mailed to Ohio to bring a Happy Easter message to a very special couple.  I just adore Daffodil Delight!  Any shade of yellow says "Happy" to me.  I used the Flower Shoppe stamp set, and of course the pansy punch.  This card took me less than an hour, and it was my first attempt.  (it always takes me longer the first time to work out the kinks)


It didn't take much paper at all.
I used a 12x12 sheet of Daffodil Delight.  Part of a 12x12 sheet of Garden Gingham and about 1/2 of a 8/12 x 11 sheet of Melon Mambo.  And a little bit of Whisper White for the back and some of the flowers.  The sentiment was cut using the Labels Collection FrameLits and the little flowers on the sentiment were cut with Floral Fusion Sizzlits.  I just love my Big Shot!!!  Added a few rhinestones here and there and SHABAM!!  Instant happiness in a box.

HAPPY EASTER!!


Tuesday, April 1, 2014

I Have a Purple Thumb!

No, I haven't slammed my appendage in a door!  My purple thumb is a good thing.  A purple thumb to an artist is like a green thumb to a gardener.  (And yes, I made that up myself, but I kinda like it.)

You see, I'm a teacher, and each team at our school is responsible for donating a silent auction item for our district's annual gala.  Our teams donation is a "gift card tree".  Since it was my idea, naturally, I was in charge of making the tree.  (Fun, fun, fun!!! and that's not sarcasm)

Here's what I managed to create:

I think it turned out cute.

So what does this have to do with a purple thumb?  Well, I'm a very messy paper artist.  And to make matters worse, I like being messy.  Just like a gardener doesn't mind getting dirt under her fingernails...I have no problem getting glue and ink all over my hands.

After stamping the flowers that I glued to the branches of my tree onto Melon Mambo card stock with Rich Razzleberry ink.....er.....you guessed it....my thumb was pretty much Rich Razzleberry colored.  AND I WAS SO EXCITED ABOUT IT!!

Like I said in my last post, I'm a "Born Again Stamper".  And when I noticed my thumb and fingers were stained in Rich beautiful purply Razzleberry, I knew I was back!  
Ink stained hands, glue smeared jeans, a couple of those Dimensions paper thingies that you peel off stuck in my hair, and I'm a paper artist again!!  

HALLELUJAH!

I think the Rich Razzleberry and Melon Mambo made a great combination.  I love the Flower Shop stamp with the matching punch.  It made the flowers so easy.  I added rhinestones, because......well..... they're shiny.....and I like shiny things.  Then to dress up the (Dollar General shhhhh, don't tell) bucket, I made a quick banner with my Perfect Pennants Bigz L die.

Does anyone remember when we used to make flowers from egg cartons?  

We've come a long way baby!!!


When I was going through my embellishments I found some old Earth Elements buttons in my stash from back before I "strayed" from stamping.  I had forgotten about those colors.  I think they were replaced with Neutrals.  I definitely need to order some new buttons. Oh darn.  (snicker snicker)

Sunday, March 30, 2014

I'm a "Born Again" Stamper!


I used to always have a "stash" of beautiful hand stamped cards.  Giving a store bought card was BLASPHEMY!  Oh the horror!  If anyone in my family needed a card, they'd call me or just drop by and rummage through my stash.  I had stamping classes and get togethers with my friends and we would have so much fun!!  They would bug me to death until I would plan the next one.

I LOVED MY STAMPING THERAPY!!  

But life happened.  And I don't even know how it happened, or when it happened, but somehow I was separated from the Paper World that I loved so much.  I became ordinary.  I didn't give cards, because I still couldn't bare to buy the ugly, cold, store bought ones.  I would just give a gift without a card.  During holidays my coworkers received little, unembellished, bags of sweets, or plain candles instead of the colorful, imaginative, smile inducing, hand made creations I had once been "famous" for.  Woe Was Me.  I was a lost sheep and didn't even know it.

Well something snapped.  Maybe it was going through old stamps.  Maybe it was my sister's death reminding me that life is short and we better embrace it.  Maybe it was my inner creative self finally screaming loud enough for me to hear......but I'm so happy that I'm back!

I spent 6 hours in a paper crafting/ stamping class yesterday and I left exhausted and wonderfully fulfilled!  It was 6 hours of the best paper therapy I've had in years.  We made a 3D flower arrangement with hand made paper flowers, a wonderful card, and a special quick and easy gift that is inexpensive to give when you just want to show someone you care or appreciate them.  Here is the 3D flower basket:

The flowers were made with Core' dinations card stock (I think mine were Rose Red) and the Big Shot Spiral Flower die (129379).  The crate is made with Baked Brown Sugar and stamped with the Hardwood background stamp (133032).  The grass is Gumball Green (126840), one of my favorite colors.  The design is by Erica Cerwin (she sells directions on her website) and I took the class with Gail Beezley.  I'm placing an order today so I can make more and offer a class too!  

This class totally inspired me!  My mind is going crazy with ideas!  Yay!